Lesson Module 1 - Basics
Lesson 1.1 - Social Objectives
Explore SL Friends
Resources:
- Friends Tutorial
- Friends list
- Account Profile
- secondlife.com account
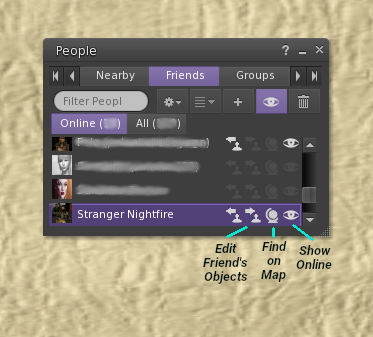
- They will show up in your Contacts list under Conversations, and you will be able to see whether or not they are currently online (their name will appear in bold at the top of the list if they are online).
- You can allow friends to find you on the map regardless of your location, and they can do the same for you.
- You can allow friends to modify your objects, and they can do the same for you.
- You can easily send messages to or start group conversations with many of your friends at once.
- Click the People button and look under the Nearby tab; right-click an avatar name, and choose “Add Friend”.
- Right-click on an avatar, and choose “Add Friend”.
- Click the Search button, go to the People tab, and type in the name of the avatar (or as much of it as you know), then press Enter. A list of names will appear below. If you see the one you are looking for, then right-click that name and choose “Add Friend”.
- IM/Call (to send them a private instant message)
- Profile (to see their profile)
- Teleport (to offer to teleport them to your location)
- Map (to see where they are on the grid, if they have allowed you to do that)
- Pay (to send them L$ from your account)
- Remove (to remove them as a friend)
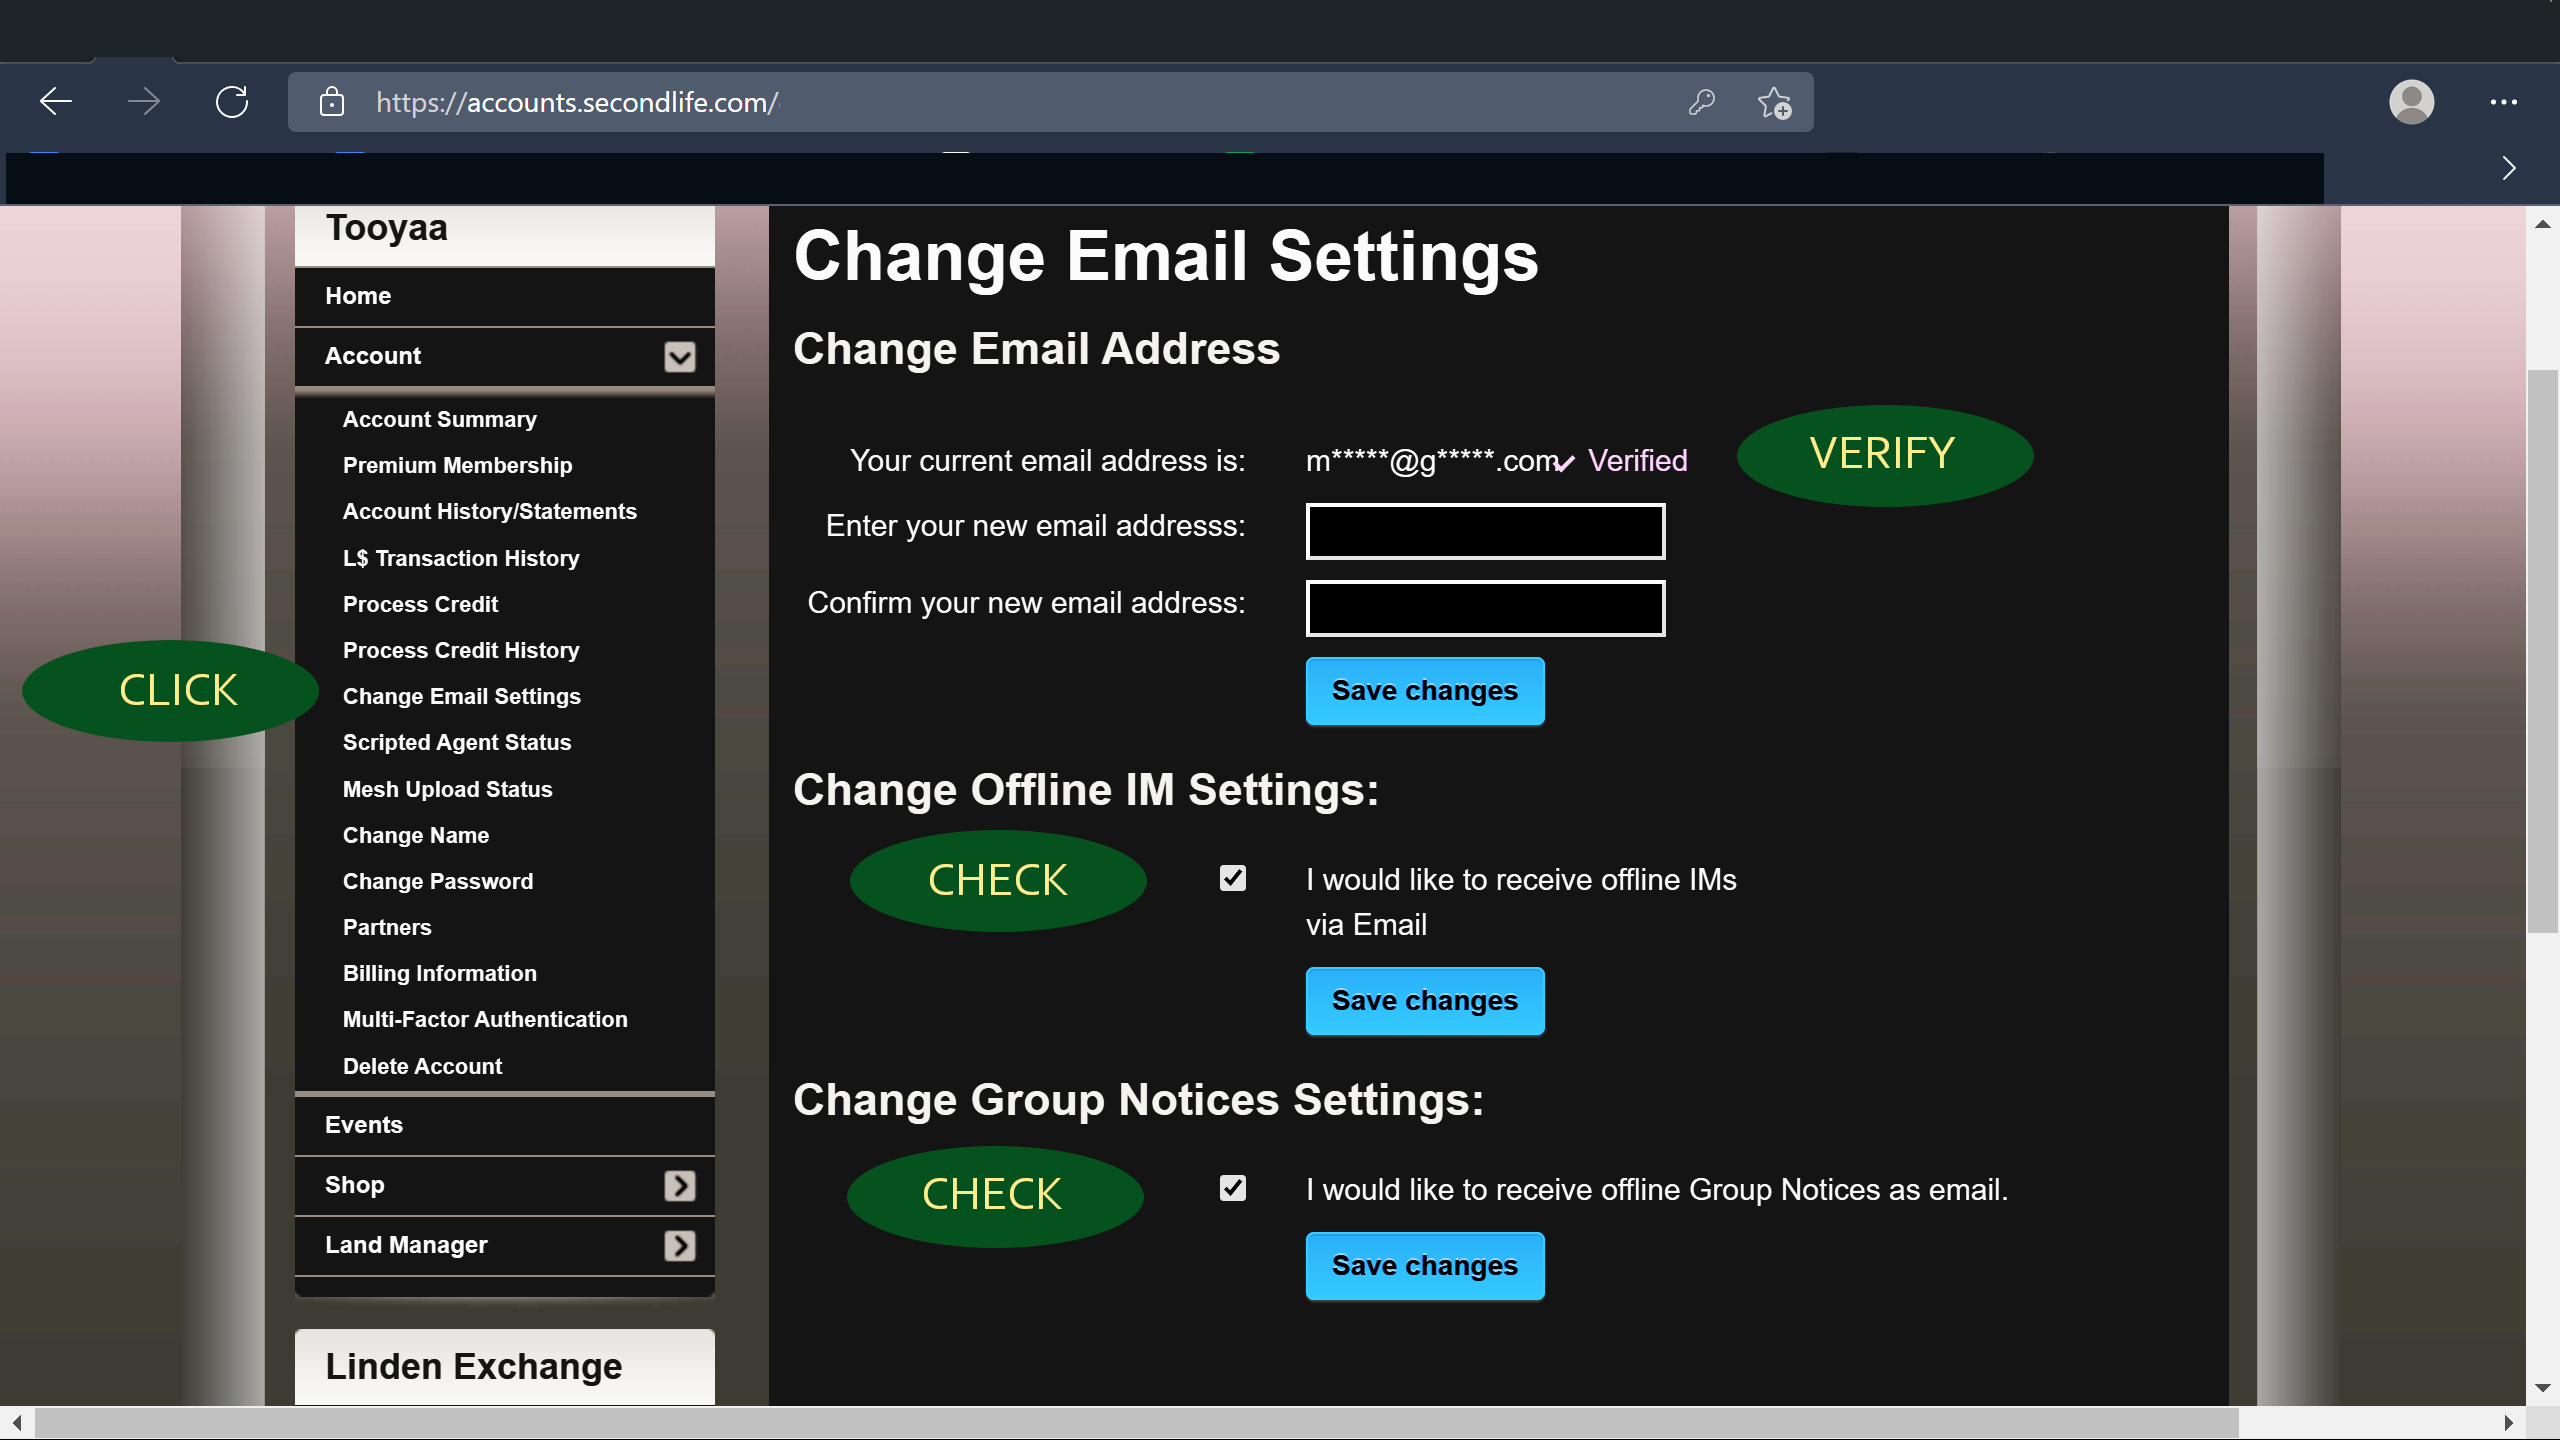
- Log in to your Second Life account on the Internet (https://secondlife.com) with your Username and password
- Click ‘Account’, then Click ‘Change Email Settings’.
- Enter your correct Email address, then Confirm it.
- Respond to the email message you receive from Second Life, to Verify your address.
- Back in your secondlife.com account email settings, CHECK next to ‘I would like to receive offline IMs via Email’.
- Also CHECK next to ‘I would like to receive offline Croup Notices via Email’.
- Click ‘Save Changes’ button, and confirm that your email preferences have changed.
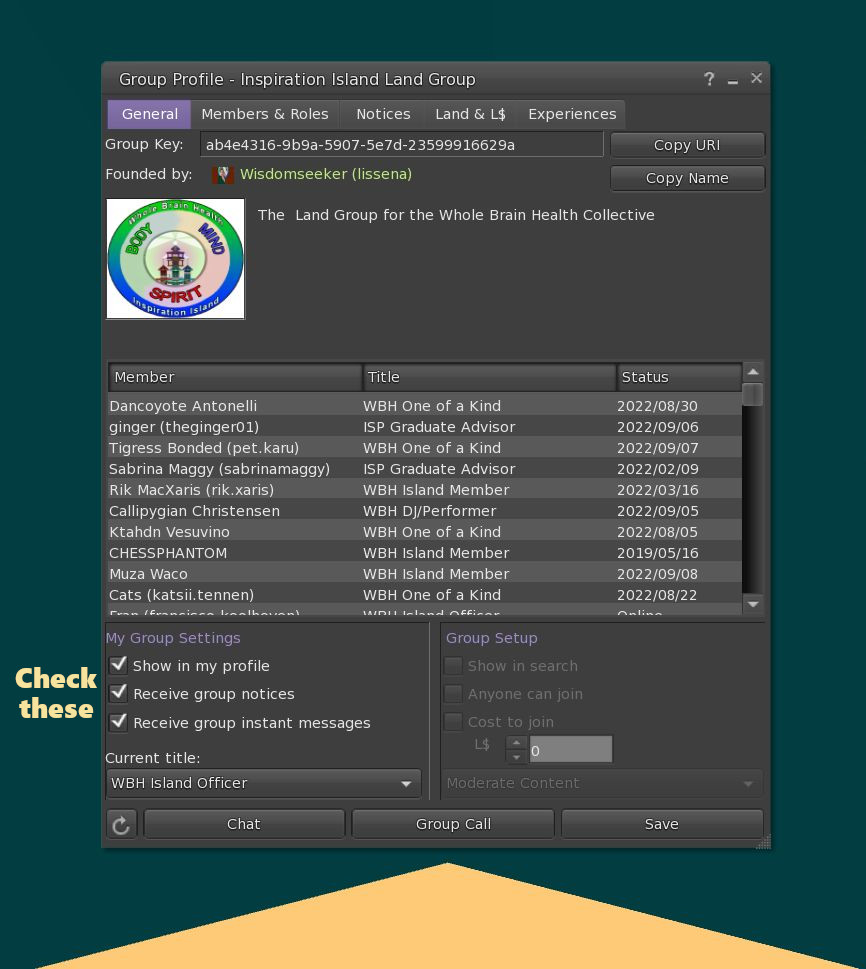
- Show in my profile
- Receive group notices
- Receive group instant messages
- Open your Profile in SL.From Firestorm Menu, click ‘Avatar’, then click ‘Profile’
- The first tab of Profile ‘2nd Life’ displays your Display Name and Account Name, your profile picture, and a lot of other information you want to share publicly.
- Next to your Name is a Wrench icon. To change your Display Name, click the Wrench. A new window pops up, with spaces for you to type your Display Name, and Confirm it.
- Save it.
nbsp;
Tutorial 1.1.1 - Friends in SL<span style='font-weight:normal;font-style:italic'><--click to open/close</span>
Just as in your real life or on other social platforms, you can “friend” other avatars within Second Life. Some of the advantages of doing this are:
You should only request friendship from avatars you already know, or ones who you have spoken to enough to have developed a close relationship. It is always considered good etiquette to first ask the avatar in instant message (IM) if they want to be your friend, rather than just dropping a friend request on them without any warning.
How to friend someone
There are different ways that you can friend someone:
The other avatar will then need to accept your friend request. They will receive a pop-up request box at the top right of their screen, and will need to click “Accept”. Once this is done, the friendship is made.
IMPORTANT: Make sure the other person knows you’ve sent the request, so that they don’t miss the pop-up message, which can easily be hidden behind other windows, and which also disappears after 30 seconds. If they do miss the pop-up, then they can look in the Conversations window and find the request in the form of an IM (instant message) from you, and they can click the Accept button there.
Conversely, if someone tries to add you as a friend, then you will see a pop-up request at the top right of your screen telling you someone wants to make friends with you, and you will need to click “Accept”. Also be sure to check your instant messages for friend requests that you may have missed.
What you can do after friending
Once you have friended someone (or they have friended you), you will see their name under the Contacts tab of the Conversations window. You can then highlight their name, and click one of the buttons along the right side of the Conversations window to do different tasks:
Assignment 1.1.1.2 (1 point): IM Tooyaa (Thuja Hynes). Tell Tooyaa something you like about this course thus far.
ACTIVITY 1.1.2:
Explore SL Groups, Roles, & Abilities
Resources: Tutorials, Group List, Group Profile, SL Search
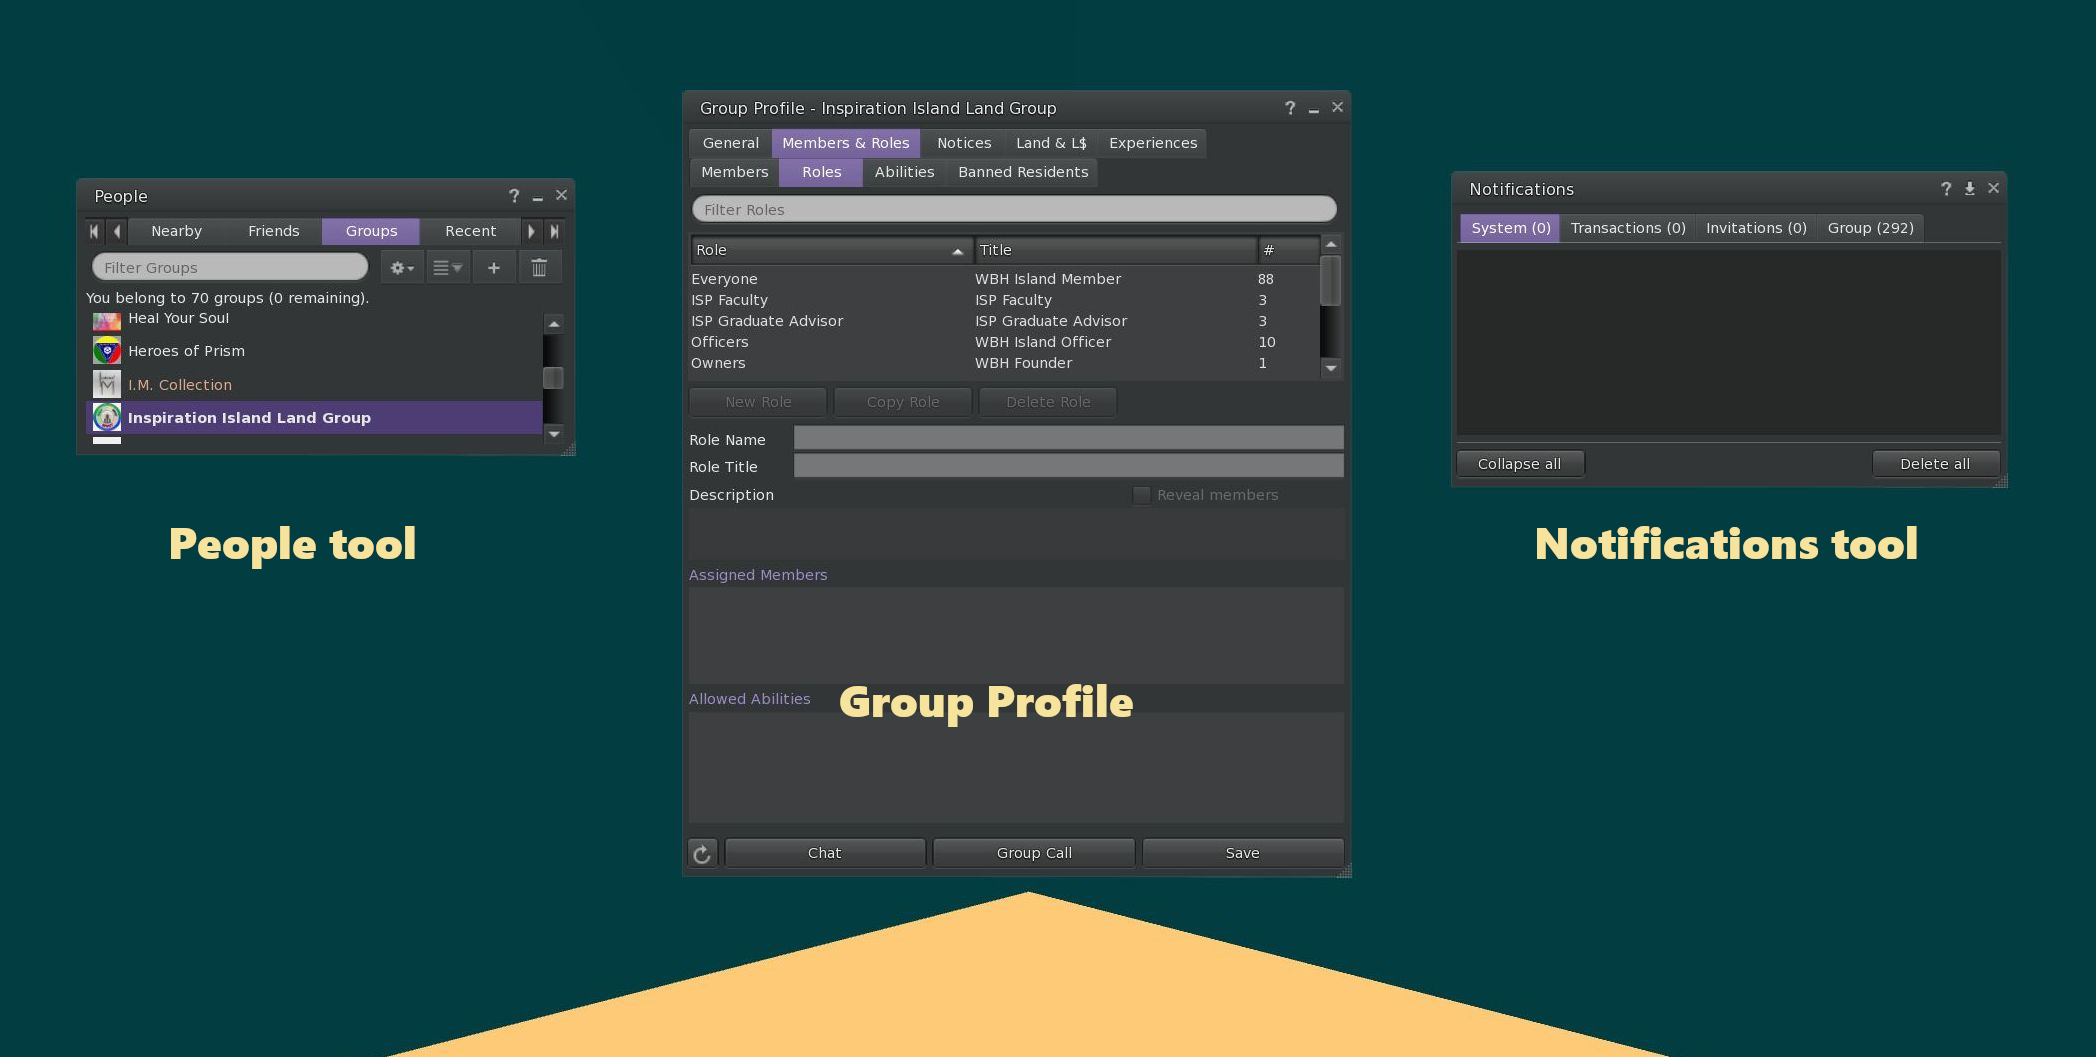
Image 1.1.2 – Group List, Group Profile, Notifications
Tutorial 1.1.2.1 - About SL Groups<span style='font-weight:normal;font-style:italic'><--click to open/close</span>
Second Life Groups are organizations of SL residents who have common interests. Many creators and sellers have groups for their customers. Other groups promote music, art, or literary events.
One of the lists available by clicking the People tool, is Groups which your avatar belongs to.
A Group has a Name, one or more Roles, and a Group Key serial number like a Resident has. Every Group also has a unique URI – Uniform Resource Identifier. The URI for Inspiration Island Land Group is:
secondlife:///app/group/secondlife:///app/group/ab4e4316-9b9a-5907-5e7d-23599916629a/about/about
TRY IT! Click HERE to copy the above URI for the Inspiration Island Land Group to your clipboard, then paste it into nearby chat of your Firestorm browser and press Enter.
Pasting a URI into Chat yields a clickable link to open the Group Profile, including the option to Join, if allowed. One way to find Groups is by using the Groups tab of Search, and then typing in a term and pressing Enter.
All Objects in Second Life can have a Group association, and all Residents can have one Group active.
A Group can have one or more Roles, which permit members to perform different sets of abilities related to payments, notices, land management, and administration.
Like Residents, each Group has a Profile, which contains information about who founded the group, what land it owns, members, and Role “tags” which are the messages that float above Residents’ heads.
Joining a Group
Some Groups are open enrollment and free to join. Others can be joined only by invitation, or may cost L$ to join.
As with Friend invitations, a Group invitation will pop-up in the upper right corner of the viewer. If you miss the pop-up, you can find the invitation in the Notifications “chicklet” (top right button).
Some organizations may have more than one Group. For example, Whole Brain Health is an open enrollment group for anyone interested in our activities, but Inspiration Island Land Group is an invitation-only Group for Residents who are given more abilities related to business and land management.
Tutorial 1.1.2.2 – Receiving Group Notifications and IMs via Email
During the course, we may be sending you messages to your Groups, as IMs and as Notices.
You will be invited to Join several Groups, including your University group and the Inspiration Island Land Group.
Every Group member is assigned one or more Roles. Each Role has Permissions, such as “Send Group IMs” and “Create Objects on Group Land”.
Second Life account-holders must do the following steps to ensure they will receive notifications and Internet messages from their Groups, even when they are not logged into Second Life:
How to Get Offline Email Notifications<span style='font-weight:normal;font-size:13px;font-style:italic'><--click to open/close</span>
Assignment 1.1.2.1 (1 point): Join Inspiration Island Land Group when invited
Assignment 1.1.2.2 (1 point):
Set your SL Account Email settings and Inspiration Island Land Group notification settings as per the Tutorials, to ensure you will receive IMs and Notices.
Send an IM to the Inspiration Island Land Group to confirm your settings work.
ACTIVITY 1.1.3:
Display Name
Resources:
Tutorial, Avatar Profile
Tutorial 1.1.3 – Creating Helpful Display Names
An avatar in Second Life must have an account name, but may also have a separate Display Name. Both names are displayed over an avatar’s head, and in lists such as Friends or Group Members. Some lists show the Display Name followed by the Account Name in parentheses, such as ‘Fran (Francisco Koolhoven)’
Some residents choose a display name that describes their interests, such as “TechWiz” or “Soul Diva” One good use of the Display Name is telling other residents what to call you, such as “Maria” or “Henry” because some Account Names can be difficult to say.
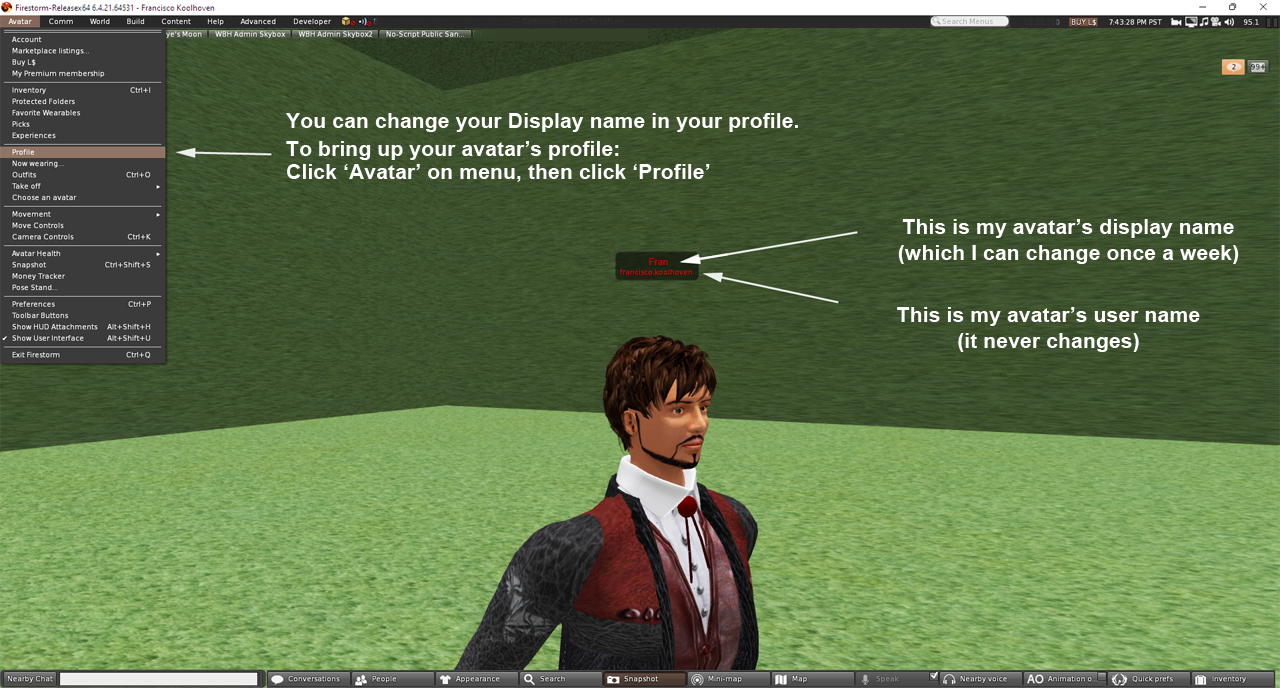
Image 1.1.3.2 – Changing your Display Name

You may change your avatar’s Display Name as frequently as once per week. To do this:
Assignment 1.1.3 (1 point):
Think of a simple Display Name your teachers and friends can call you in Second Life. Create or Change your Display Name.
Tell your new Display Name in your course Blog.
Lesson 1.2 - Customize Toolbar
Add & Remove Toolbar Buttons
Resources:
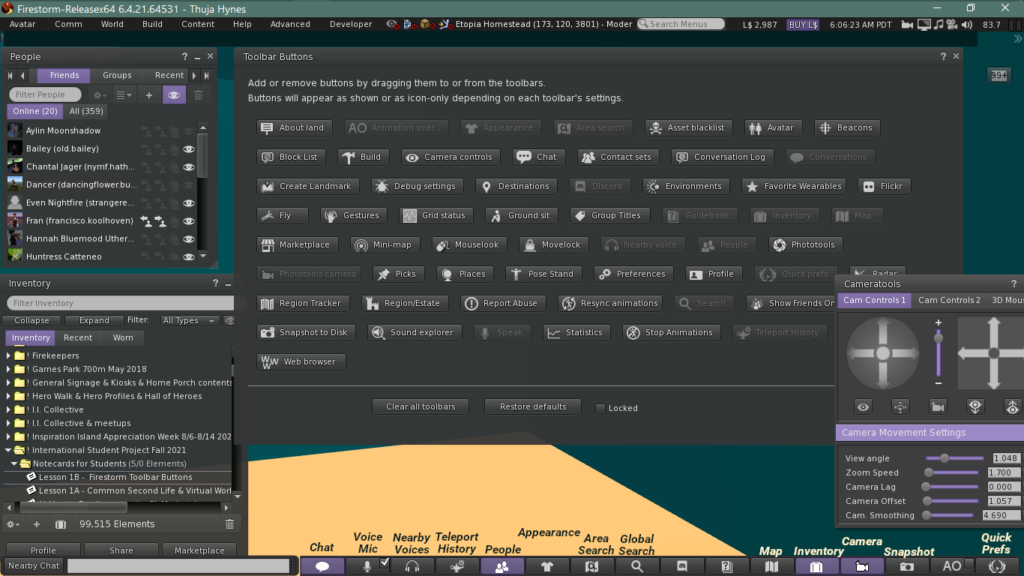
Image 1.2.1 – Firestorm Toolbar & Menus
Tutorial 1.2
Toolbar is at the bottom of the Firestorm viewer, by default.
- Right-click the toolbar to see menu.
- In menu, click Toolbar Buttons to see ALL available buttons.
- Drag a button from the list to the Toolbar.
- Drag a button left or right to move it in the Toolbar.
- Right-click a button and choose Remove this button, to remove it from the Toolbar.
Assignment 1.2 (1 point):
- Add and remove Buttons of your choice to Customize FS Toolbar.
- In your course Blog, and in a SL Notecard, describe the Toolbar button changes you made. Title the notecard “(your name) My Toolbar Buttons”
- Send notecard to Tooyaa (Thuja Hynes) in SL, by IM.
Suggestions:
Speak button, Snapshot button, Inventory, Map, People, Walk Run Fly, Quick Prefs
Lesson 1.3 - Textures
- Explore uses of textures
- Aspect ratio
- Renaming
- Uploading
- Permissions
- Apply texture to Object face
- Inventory folders
Resources:
https://secondlife.fandom.com/wiki/Texture
Download Irfanview: https://www.irfanview.com/main_download_engl.htm
Download GIMP: https://www.gimp.org/downloads/
Sample textures; sample prims; L$; Instruction notecards
Image 1.3.1.1 – A Brick .jpg Texture .

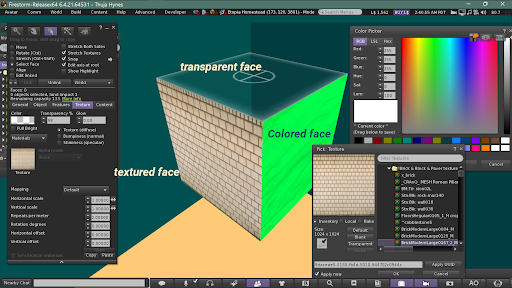
Image 1.3.1.2 – Firestorm Edit Texture Menus
Tutorial 1.3.1 - Uploading Textures<span style='font-weight:normal;font-style:italic'><--click to open/close</span>
How to upload images into SL
Your image should be in JPG or PNG format, and the resolution should not usually exceed 512×512 pixels.
Aspect Ratio is the width-to-height ratio. 1×1 is square; 3×2 is attractive for presentation slides.
In an image manipulation program such as IrfanView or GIMP, trim the texture dimensions to fit the aspect ratio of the prim face you are texturing.
You will need L$10 in your account for each image you want to upload.
1. Go to the menu at the top of your SL viewer, click on Build, go down to Upload… then click on Image.
2. Find and select the image you want to download.
3. You’ll see a preview of the image. Click the “Upload (L$10)” button to complete.
4. The image will show up in your “Textures” folder.
- Upload a thematic texture (cost L$10)
- Apply it to a prim face with correct aspect ratio
- Name object “<-your name-> Textured Prim.”
- Give object “Transfer” permission only
- Send object to Tooyaa (Thuja Hynes) in SL
ACTIVITY 1.3.2:
Explore Photography in SL
Resources:
Image 1.3.2 – Group Portrait, Aspect Ratio 1×1

WBH Photo Studio:
http://maps.secondlife.com/secondlife/Wellbeing%20Island/30/230/3809
Photography Wiki:
http://wiki.secondlife.com/wiki/User:Torley_Linden/Snapshot_tips
Video:
https://www.youtube.com/watch?v=7ziKsxk3E0c
Assignment 1.3.2 (1 point):
- Take Snapshot in world of fellow students, in the class setting
- Save it to Hard Drive
- Email the Snapshot to Tooyaa: mcneillissa@gmail.com
- Add the group photo to your course Blog
Lesson 1.4 - Second Life Lexicon
Explore terms and acronyms, use in class setting, identify specific local current examples.
Resources:
- http://wiki.secondlife.com/wiki/Second_Life_Glossary
- https://secondlife.fandom.com/wiki/Category:Glossary
- Google Translate (https://translate.google.com/)
- Lab announces the ending of gacha machines in Second Life
- https://danielvoyager.wordpress.com/
Assignment 1.4.1 (1 point):
- Select a SL Blog from above list and report on 10 SL terms you learned in a notecard, or your own course blog.
Suggestions:
[sim, region, parcel, teleport/tp, landmark/LM, slurl & coords, rez, create/build, prim, IM, group, notecard, inventory, preferences, viewer, FS, SL, attach, texture (noun & verb), …] - Send the notecard to Tooyaa (Thuja Hynes) in SL.
Assignment 1.4.2 (1 point):
- Metaverse Acronyms
- Acronyms and abbreviations like SL, WBH, tp, and ttys are ubiquitous in the Metaverse.
- Write a complete sentence using your favorite Metaverse acronyms, in your choice of language.
- Post your sentence in your course blog.
